This Wednesday was the first day of my short course: “Digital Film: A Practical Introduction” at City University. At the end of the course, I will have made my second short film, expand my knowledge of filmmaking along with some much needed practice and hopefully a new contact.
The first thing we did was to introduce ourselves, talk about any experience of any production work we may have and why we have applied for the course. Well, as you may have gathered I have made one film, “Headline”, a short horror/thriller which has a few hundred hits on YouTube. I made the film with a mate from college as a part of our coursework and the school awarded us with an award. I have been writing now for nearly a year and have joined the site Circlait, a Facebook for writers where we can upload our work.
The very session was primarily based on what a Director’s role is and why that person is important. Their job is to tell a story – very simple and that’s the main criteria in which a Director is assessed by. To do this, a Director has five components in which to do so.
1. SHOT SIZE.
2. MOVING CAMERA.
3. CAMER ANGLE.
4. SELECTIVE FOCUS.
5. COMPOSTION.
Not every component can be used whilst filming one particular scene however these can be used whilst he/she dissect the scene in the script.
SHOT SIZE
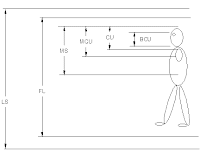 Shot size is the most important – shots make scenes, scenes make films. Without them, there would be no film obviously. We were introduced to the three basic shot sizes: CLOSE-UP, MID-SHOT AND LONG SHOT. The selection of the shot size is extremely important as it shows the relationship between the subject and their surroundings (making it objective or subjective.) The long shot allows the audience to see the subject in its entirety; whether that is a human (head to toe), a dog (nose to tail), or a car (bonnet to bonnet.)
 Shot size is the most important – shots make scenes, scenes make films. Without them, there would be no film obviously. We were introduced to the three basic shot sizes: CLOSE-UP, MID-SHOT AND LONG SHOT. The selection of the shot size is extremely important as it shows the relationship between the subject and their surroundings (making it objective or subjective.) The long shot allows the audience to see the subject in its entirety; whether that is a human (head to toe), a dog (nose to tail), or a car (bonnet to bonnet.)
There is also a significant difference between a long shot and an ESTABLISHING SHOT. A long shot, as mentioned previously, shows the subject in its entirety, making the shot objective, whilst an establishing shot shows the context of their surroundings. Therefore, this makes the shot subjective.
We then tried to put this into practice by creating a scene of the top of our heads as a class. For convenience, we based the scene in the very room we were in. Now, as Director we have the choice to put the camera in any place of the room to convey and more importantly show the lecturer in the front of the room and us. We could place the camera at the back of the room, so we can see the lecturer and the back of our heads. Or place the camera at the front to see out faces.
This brought up our next shot, the MASTER SHOT. The Master shot is default shot for the scene and is particularly loved by the Editor as they have something to cut to. It was then decided that our Master shot would be by the door; the lecturer would be in profile and that we could be seen.
To make it interesting and not to tell too much, our first shot would be an Establishing shot of one of us at the front writing pad writing: "This guy doesn't know what he is talking about." We would then come out and have a TWO SHOT of the two guys at the front table. The guy who wrote the message shows it to his neighbour and they would both snigger.
This begins to make the audience ask questions: "Who were they talkng about? Who doesn't know what he is talking about? Where exactly are they?" Which are all GOOD.
Then, we would go to our Master shot as the lecturer begins to speak and then to a mid shot from the back of the room. This is known as COVERAGE, filming the scene in more than one type of shot and to do this, there would be two SET-UPS:
The first one would be the camera placed at the door to film our Master shot and the second, at the back of the room to film our Mid-shot.
We would then have at least another three Setups - one to film the Establishing the shot, another to film the Two-shot and the final one to film the Close-up of the lecturer.
That was our first task as it highlighted a dillema for the Director - THERE ARE SEVERAL WAYS TO SHOOT A SCENE.
MOVING CAMERA

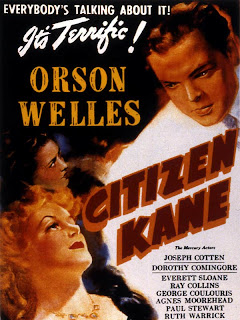
The first clip we watched was from a scene from "CITIZEN KANE", a 1941 film by Orsen Wells. The scene we watched was quite interesting as it was composed of one shot; however it was the use of camera movement that allows all of the three primary characters to stay in shot when Kane moves across the room and another character, Sonny enters.
What makes this scene that tiny bit more interesting is that we also see Kane move across the room and then across camera as well! However, in doing this, we would in fact lose a character. There was a simple resolution to this – he leans forward. Remember that this film was made in the 1940’s so this scene is pretty clever, especially when Kane writes down his pledge; he is in completely in shadow. This foresees what will happen later in the rest of the film as its theme is about corruption.
There is one more little sneaky thing that happens in the scene and this is seen when Sonny enters the scene. By showing his entrance, the camera pans to his direction ever so slightly, meaning that the same character as before is going to be lost. Kane performs a cheeky step back, allowing the camera to move along with him and to bring that character we lost momentarily back into view.
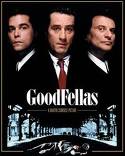 The second clip we watched was from a scene from the “GOODFELLAS”, a 1990 film by Martin Scorsese. This scene, like the previous one has no editorial cuts however it’s fancier. The protagonist introduces his girlfriend to his way of life, entering clubs from the back, handing out a huge amount of money to everyone he sees for priority treatment. The scene starts with focusing on the money as he hands it over to the cab driver, informing the audience that this is the main focus and shadows what is going to happen in the scene. The camera placed on cranes swoop elegantly tracking the two characters and this cleverly mirrors to the story, he sweeps her off her feet seeing how he is showing off to her.
 It can still be argued that it was Scorsese being flash although being a huge Hollywood production, he can afford to! The amount of rehearsal time to get it all flowing, the incredible amount of extras used on set, the construction of the set starting from outside the club to the back entrance and through all the rooms. This is an enormous amount of time and money for a three minute scene.
CAMERA ANGLE:
There are two axes that we can use; the HORIZONTAL AXIS and the VERTICAL AXIS. The VERTICAL AXIS is used to depict the STATUS of a character. If the camera is placed above the line, we look down on the character, making them smaller, less important. If we were to place the camera below the line, we look up on the character, making them superior and of a high status.
The VERTICAL AXIS is used to determine how the scene can be view as OBJECTIVE or SUBJECTIVE. The closer you come to the centre of the line; the scene becomes OBJECTIVE and more personal as it appears that the character is talking to the audience. This is imperative for good STORYTELLING as its basic human communication skills; if you are engaged with the person who is talking, you look straight in their eyes. That’s also why we are not one hundred per cent content with that scene we watched from “CITIZEN KANE” – we couldn’t see his eyes when he delivers his pledge.